This usually allows manufacturers to create external drives that can be hot-swapped (via USB) more easily than with IDE drives. However, this usually also works for internal drives.
If you have an internal SATA drive (hard-drive, DVD drive, etc.) which is not connected to the motherboard and boot up Windows, not surprisingly, it will not show up in the Device Manager. If you then connect the drive’s data cable to the motherboard (and perhaps optionally) do a re-scan in Device Manager, the drive will then show up because the SATA controller detected the drive and made it visible to Windows.
This is great. If you accidentally forget to connect a SATA drive to the system and don’t want to shut down or want to create your own sort of external drive, this feature is very helpful.
Unfortunately, like most things, the pros come with cons. In this case, while the newly connected drive becomes visible to Windows and is usable, it will likely have poor performance. Windows loads the drivers for the drive on boot, so if you connect the drive after booting, instead of loading the tuned, high-performance drivers for it, it will end up using simple, low-speed access to (i.e., it will not use UDMA). You can see this as extremely slow transfers to/from the drive. If you do this with a DVD burner for example, it will be limited to ~2x even if you set it burn at 8x or whatever). You can also see this effect in the Task Manager’s Performance tab; the CPU load will jump when you use the drive, but no processes will spike because the load is coming from the kernel. This may or may not also occur in Linux or Mac.
So while SATA allows hotplugging drives, it doesn’t mean it will work well. Manufacturers will still need to provide a shim to allow for maximum performance and OS developers will need to better detect newly attached SATA drives and load the drivers at runtime.
When viewing files in thumbnail mode in Windows Explorer, there is a limit. In Windows XP, Explorer can only show thumbnails for up to 4,096 (4K) files. After that, files begin showing either a completely white image or the icon of the program associated with that file-type.
Which files are given a thumbnail or not is determined by the order in which they are displayed. For example, if a folder containing 5,096 files is put in thumbnail mode and the first 2,048 files are viewed, then End is pressed and the list is scrolled up, the first and last 2,048 files are given a thumbnail and the middle 1,000 files are left blank. (Of course if the list is scrolled around with the scroll-bar, then seemingly “random” blocks of files here and there may be left blank.)
(There may or may not be a limit in Windows 7 as well. A test will be done and results will be added.)
Pursuant to an argument at this Super User question, I have done some testing and written a test program to try to clarify the situation with current-working-directories.
As Raymond Chen explains, per-drive CWDs have been around since DOS, which makes sense because DOS’s only interface was the command-line. He goes on to explain that in Windows, the command prompt keeps track of per-drive CWDs by using environment variables.
The point is that while the actual manner in which they are tracked may differ, there are per-drive CWDs in all Microsoft operating systems from DOS, up to Windows 7. This can be easily demonstrated with the following program (adjusting drive letters and paths as appropriate).
#include
#include
#include

void PrintCWDs() {
	char cwd[260]="";
	for (int i=3; i<27; i++) {
		if (!_chdrive(i)) {
			getcwd(cwd,260);
			printf("  %c: = %s\n", 64+i, cwd);
		}
	}
	printf("Press a key...\n");
	char key=getch();
}

void ChangeCWDs() {
	for (int i=3; i<27; i++) {
		if (!_chdrive(i)) {
			switch (i) {
				case 'C'-'A'+1	:chdir("\\Windows\\System32\\Drivers");		break;
				case 'H'-'A'+1	:chdir("\\Temp\\Chromium\\Cache");			break;
				case 'K'-'A'+1	:chdir("\\Data\\eMail\\OE");				break;
				case 'P'-'A'+1	:chdir("\\Videos\\Commercials");			break;
				case 'T'-'A'+1	:chdir("\\Program Files\\Common Files");	break;
			}
		}
	}
}

int main(int argc, char**argv) {
	printf("\nOriginal CWDs:\n");
	PrintCWDs();
	printf("\nChanging CWDs...\n");
	ChangeCWDs();
	printf("\nNew CWDs:\n");
	PrintCWDs();
	printf("\nAnd again:\n");
	PrintCWDs();

	return 0;
}
This program shows that the CWD is maintained for each drive in DOS, Windows XP, and Windows 7 as seen below.
After much testing, I have determined that the reason that I was experiencing problems installing drivers, software, or updates in Windows recently was because I had removed the user-level environment variables for TEMP and TMP even though they were still available via the system-level environment. Creating copies for the user environment fixed the problem (at least the installation problem, now there is the issue of redundant environment variables, but that’s not so bad).
Some of the id Tech 3 (aka Quake 3)-engine based games won’t run correctly on Windows Vista, 7, etc. due to the UAC. Some people suggest turning UAC off or running the game as an administrator, but that is ill advised; turning off security or running it in a higher privilege to play a game is foolhardy at best, especially when a better, more secure solution is readily available.
The problem is that when these id Tech 3-engine games start up, they try to extract a DLL from one of the PK* files into the program directory. Since the Program Files directory is protected, and especially since the file being dropped into it is a DLL which as a security threat is second only to EXE files, and finally because it’s being put in the folder by a non-privileged program—the game itself—as opposed to a privileged program like the original setup program that installed the game in the first place. This all leads the system to blocking the extraction, which causes the game to terminate with an error that includes the following snippet.
found DLL in pak file: C:\Program Files\Prey\base\game03.pk4/gamex86.dll
copy gamex86.dll to C:\Program Files\Prey\base\gamex86.dll
could not create destination file
********************
ERROR: DLL extraction to fs_savepath failed
(Windows Vista/7 already have a system in place for this sort of thing and it usually works for games (eg for games that store screenshots or save games in the Program Files directory); such files are put in the VirtualStore directory in the user’s profile instead of in the actual Windows or Program Files directories, but for some reason it does not seem to work for these older id games.)
Instead of resorting to turning UAC off or running it with administrator privileges, a much more ideal solution is simply to manually extract the DLL file in question and place it into the program folder. Open the PK* file mentioned in the error (in the above example it is game03.pk4) with a ZIP compatible program (7-Zip is great). Then simply extract the file gamex86.dll into the game’s base folder (or other, possibly different folder as specified in the error).
Note: You probably won’t be able to simply extract the file directly to the program folder because of the permissions/UAC, you’ll likely need to either run the archiver as administrator or just take an intermediary step by extracting it to somewhere else like the desktop, then moving the file to the program folder (and saying yes/OK to the UAC prompt).
Done. Now launch the game, see how it runs as expected without requiring a security feature to be turned off or running it as administrator, and enjoy!
Support for old software is not a high priority anymore and is fading fast. This is bad news for gamers who want to play those old DOS (and even Windows) games that do not run on modern hardware and operating systems.
One solution is to find old hardware to run those old games on. This is the ideal solution from a compatibility standpoint, but has its own drawbacks like extra physical hardware, electricity, space, cost, and so on. Another solution is to use hardware emulation software that tricks the old software into thinking that it is running on the hardware that the emulator tells it. This is less compatible, but has advantages like price and convenience.
Emulators like DOSBox, VMWare, Virtual PC, Parallels, QEMU, and the like are a great way to go in a lot of cases. But, for really intensive games like FPSes, you will probably want to run them natively to get better performance.
The three biggest obstacles in running old software on modern computers natively are CPU, sound, and audio.
Old software was not designed to run on modern CPUs which are often too fast, and also have multi-threaded/core functions. Worse, modern systems are moving to a model that old software developers could not even conceive of in those days. There are programs that can slow a system down (usually by running the CPU in a controlled, but infinite loop) so that the old program gets fewer CPU cycles, but a much better solution is to use an emulator.
Audio in a program running natively has been handled for the most part by VDMSound. It has not been updated in a long time, but most class-gamers will attest that it works for most purposes. Emulators work well too, but they do not usually offer as wide a variety of sound cards.
Video has had its share of hacks as well. Ken Silverman—they guy who created the Build engine which powered games like Duke Nukem 3D—released a couple of tools (NOCLI and NOLFB) that will modify old apps so that they can run in XP without locking up. However, even with those, most graphics programs (eg games) will usually freeze in XP on startup and display only the first frame. The way to fix this is to install the Full Screen Video Driver For Console which comes with Windows XP but is not installed by default:
Open the Control Panel
Run the Add Hardware applet, click Next, wait
Select Yes…already connected
Scroll down and select Add a new hardware device
Select …manually…(Advanced)
Select Show All Deviced
Select Microsoft Corporation for Manufacturer and Full screen video driver for console for Model
That’s it. Now graphical DOS software should run properly in Windows. You can still use NOLFB and NOCLI if needed. Windows 2000 could not only run graphical DOS software full-screen, but it could even run them in a window, which XP cannot do. That was a great feature that is missed. Windows Vista has changed quite a bit that a lot of even XP softare will not run in it. It’s adoption has been pretty slow, so we’ll just have to see what gamers come up with for it, although it may very well be the case that XP is the last OS for classic-gamers: future classic-gamers will probably have to run emulators that hopefully will be much better.
If Windows Explorer seems to freeze for a few seconds (or a few minutes) whenever a folder, especially top-level folders, are selected, then it could be XP’s auto-sensing feature that is to blame.
Windows XP introduced a feature that peeks inside a folder to determine what the predominate filetype is and provide file-specific tasks for it. For example, if it finds that there more picture files in the folder than anything else, then it will place tasks such as “Print pictures” and “Order prints online” in the Common Tasks pane to the left. It will also place a graphic watermark indicating the “folder type” in the bottom-right of the folder.
This feature is debatable because it has limited use since most people have other ways and programs to do these common tasks. Worse still, if a root folder somehow becomes tagged as a special folder, then all of its subfolders are scanned every time that it is selected, which is what causes the freezing.
Fortunately it is easy to fix. Open a folder that is not “special”, that is, open any folder whose common tasks pane displays “File and Folder Tasks” and has no watermark. Now click the Tools menu and select Folder Options. Click the View tab and then the Apply to All Folders button (then OK). This sets all folders to be the same as the current folder (non-special).
You should now be able to click any folder without it freezing for a while.
As a furtherance to this task, you could also set up other aspects of the folder to be exactly like you wish before clicking Apply to All Folders. This way, all folders will have the same columns, view setting, common task layout, and other attributes that you desire since they will anyway.
(As a side note, it seems that the delay is compounded by the presence of LNK files (Windows shortcuts) and URL files (IE bookmarks)—and possibly PIF files (DOS shortcuts)—in the subfolders as removing them eliminates, for the most part, the freezing. Broken shortcuts increase the delay as do bookmarks to FTP sites. No explanation as to why they affect common tasks has been found.)
It took over two years but I finally figured out how Microsoft calculates the color of the selection marquee in Windows.
Windows XP implemented a fancy new feature whereby dragging a selection box (aka, “rubber-band”) around files and folders in Explorer windows will draw a transparent rectangle instead of a gray-dotted box.
This is a feature of the Common Controls 6 and can be added to list controls by setting the preprocessor _WIN32_WINNT to 0x0501 or higher and setting the LVS_EX_DOUBLEBUFFER extended style of the list control.
It’s no secret that the color of the outline of the selection rectangle is set to COLOR_HIGHLIGHT which is the color set for selected items. But, what about the rest of the rectangle? Where does the color for the inside of the rectangle come from?
Obviously it’s calculated dynamically from the selected color and the color of the window background (COLOR_WINDOW) since it’s “translucent”. A little testing confirms this. But, what is the equation? What formula is used to blend these two colors?
A few years ago I determined to find out. I began by collecting data. This meant using the Display Properties dialog to set the selected and the window background colors, then drawing a selection rectangle and examining what the resulting color is. After doing this for dozens of pairs of colors, I had a data set and decided to figure out what they have in common. This turned out to be trickier than expected and I put it aside and occasionally looked at it briefly over the next two or three years.
This month when I learned of the LVS_EX_DOUBLEBUFFER style, I became more determined than ever to figure it out. Luckily I could not find the original data set (which would have surely side-tracked me for a while), so I decided to compile a new one with a controlled set of values instead of the random ones I had previously used. I used the following values: 0,64,128,192,255 in (almost) all the permutations of R/G/B and selected/background. I created a macro to automate the process of:
Selecting the selected and window background colors
Applying the theme
Switching to an Explorer window and drawing a rectangle
Taking a screenshot of the window and rectangle
Pasting the screenshot in MSPaint
Using a colorpicker app to determine the three colors and copy them to the clipboard
Pasting the colors in Notepad(2) in the proper format
Saving the file (to avoid losing all that work)
This automation allowed me to complete all 289 (17×17) permutations in just a couple of hours instead of a couple of months, since the only thing I needed to do manually was to click the correct boxes in the color picker.
Now I had a fresh, new set of data points that ranged from the min to the max in all directions. It was time to figure out the equation once and for all.
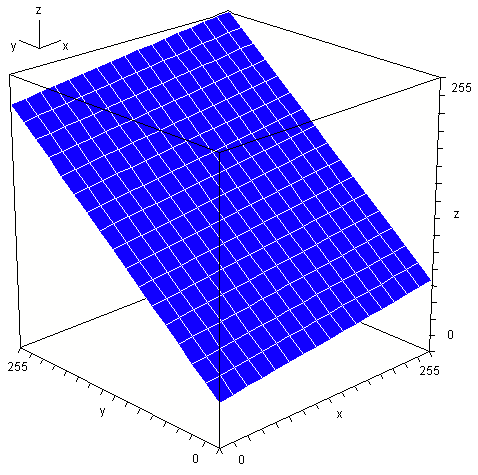
A good place to start was to plot the data points as a 3D graph where X=selected color, Y=background color, Z=blended color to see if there is any kind of visible relationship. A few minutes later and BAM! The plot was clearly a slanted plane:
Plot forms a slanted plane in 3D space.
Now I needed to figure out what the equation of the plane was. This was also easier said than done.
I decided that the most obvious next step was to use Cramer’s rule to determine the planar coefficients A, B, C, and D, then plug them into the equation of a plane and rearrange for Z. This meant taking three points (I had 289 to choose from) and calculating the planar coefficients. Plugging those into the plane equation would result in this z=-(Ax+By+D)/C where ABCD are replaced by numbers. This leaves an equation with two unknowns (two input variables). That would be the solution.
Unfortunately, this did not work. I was using COLORREFs (DWORDs) which combine all three color components in the following manner: C=R+256*G+256*256*B. The problem with doing it this way is that any math will cause carry errors between the components (eg: C*2 would cause the R component to wrap and the carry would overflow into the G component). The solution was to determine three separate equations, one for each of R, G, and B.
Luckily this did not mean triple the work because they were all the same equation as the data shows. Ignoring the G and B components, I took the 289 data points for the R component and recalculated everything. Again, it didn’t work. Even though the points clearly lay on a plane, the numbers (even the surface normals!) varied depending on which three points I used. I was stumped again (and still am; I don’t know why it works in theory but not in practice).
Then I got a stroke of “genius”. By examining the limiting factors, I could reduce the system to its base. Since f(0,0)=41, the mystery formula obviously adds 41 to whatever the rest of the results are. Also, since f(255,255)=255, I know what the limits are. Finally, I knew the other extents: f(0,255)=227 and f(255,0)=69. That turned out to be all I needed (I donated the other 285 data points to charity). I had the following system of equations:
Using Cramer’s rule again, this time with much smaller numbers for a single color component, and then reducing, I got the the nice and simple formula z = 41 + (28*x + 186*y) / 255. A quick test showed that the results were correct (actually a few were a bit off, but almost all of those were fixed by rounding instead of truncating, and the last few off-by-ones are due to using different data sizes and order of calculation).
So there you have it. After two-and-a-half years, the solution presented itself: c=(28s+186w)/255+41 (s=selected, w=window background—or texture).
Here is a function for calculating the marquee color (selection rectangle), printed here with separate component variables for clarity’s sake.
Brief: Windows Vista (and 7) have changed things a little. For starters, they have made it so that the transparent marquee occurs on the desktop (COLOR_BACKGROUND) naturally when the option is selected without requiring the LVS_EX_DOUBLEBUFFER style to be manually set (the desktop is just a list-view control). In addition, while they still use the selected-item color (COLOR_HIGHLIGHT) for the border of the selection rectangle, they no longer use it in the calculation of the rectangle’s interior color. Instead, they combine the background color with the hyperlink/hot-tracked color (COLOR_HOTLIGHT). In addition, unlike in XP which uses a single formula, Vista and 7 use different formulas for calculating the color of the marquee depending on whether it is being drawn in an Explorer window or on the desktop.
When I decided to check to see if my marquee formula was still valid for Windows 7, a quick test showed that the selected-item color was not being used. For a moment I worried that Microsoft had simply hard-coded a color into the formula, combining a blueish color with the background, but figuring that they couldn’t be that insane, I searched through the Window Color and Appearance dialog for something that was blue. There were a couple, but I was not very surprised to find that the hyperlink entry was the one that changed the marquee color. Another quick test found that the resulting color was not the same as what the old formula would give. I had to extract the new formula.
I had hoped that I could use everything I learned the last time around to make it quick and easy this time. While it did take only a few hours instead of a few years, it was not as quick and easy as I was counting on. I looked through the files (particularly the last few modified) in the folder where I kept everything related to the prior investigation, and especially re-read this article. Unfortunately they were insufficient, particularly since I had not clearly written out one of the steps above (it’s there now), leaving me confused and struggling a bit and wasting some time by once again gathering unnecessary data points (not including the fact that I had to repeat everything twice; once for window backgrounds and once for the desktop because it uses a different formula).
Eventually I just focused on the limits like I did last time. I became a little worried that I was making a mistake because unlike in XP, the new marquee formula allows for pure black in addition to pure white rectangles (in XP, the formula limits the color to the range 41-255; remember the +41?) Worse, using middle-grey (128) for the window and hyperlink colors, gives 128, which seemed too unformulaic. I tried the numbers I had anyway.
I chose three points (0/255, 255/0, and one of the other two, either 255/255 or 0/0). I then plugged them into the formulas, factored, had a snack, watched a movie, reduced, and tested, and was done; well, for the desktop. I still had to repeat for window backgrounds. Fortunately this time I was able to cut eight or nine corners and skip right to the end, plugging in the numbers for the window backgrounds and finally had two formulas for calculating the marquee color in Windows 7 (I’m crossing my fingers that it is the same in Vista).
What’s interesting is the use of magic numbers (in this case, seemingly arbitrary in that they are not nice “round numbers” like 0, 10, 16, 64, 100, etc.) One can only assume that some GUI designers in Microsoft came up with formulas (and the corresponding values) that made the nicest, most visually appealing, yet contrasting blend for the transparent rectangle.
Windows Explorer allows you to sort the files and directories in a folder by various properties by clicking the appropriate column header. Folders always come before files regardless of name, and there is unfortunately no way to change this even though sometimes it is desirable to sort with mixed folders/files.
The algorithm for sorting by name is mostly straightforward but with some bumps. Knowing the sort order allows you to choose characters to use as the first character in a file or folder name to control sorting, for example when creating a filing system.
For the most part, the algorithm sorts files/folders by name according to their ASCII values, expect that case is ignored because on Windows, filenames are case-insensitive, that is “MYFILE”, “MyFile”, and “myfile” are all the same file—iirc NTFS can do case-sensitive but it’s actually a hack (mapping).
You should also be aware that numbers are treated as numbers and not strings. For example “123blah” will come after “2blah” since 123 is bigger than 2, even though “1”-“2”-“3” comes before “2”. This behavior can be changed with the NoStrCmpLogical option of the Explorer policies (set HKEY_CURRENT_USER\Software\Microsoft\Windows\CurrentVersion\Policies\Explorer\NoStrCmpLogical to dword:00000001).
Another bump in the algorithm is that the following characters appear out of order: +, <, and > They come after all other characters, in this order. Also, ‘ and – are ignored altogether when they are the first character.
Here is a list of characters in the order that they will be sorted when used as the first character:
1 – Not (normally) allowed as a filename character
2 – Not in ASCII order
3 – Not used in sort when first character
(space)
!
” 1
#
$
%
&
(
)
* 1
,
.
/ 1
: 1
;
? 1
@
[
\ 1
]
^
_
`
{
| 1
}
~
+ 2
< 1,2
= 1
> 1,2
–
‘ 3
– 3
This knowledge will be used in a later article to create a filing system that will allow organization of files and folders since Windows doesn’t really have symbolic links and WinFS has been cancelled until at least Windows Vienna.


.png)
.png)