Part I
It took over two years but I finally figured out how Microsoft calculates the color of the selection marquee in Windows.
Windows XP implemented a fancy new feature whereby dragging a selection box (aka, “rubber-band”) around files and folders in Explorer windows will draw a transparent rectangle instead of a gray-dotted box.
This is a feature of the Common Controls 6 and can be added to list controls by setting the preprocessor _WIN32_WINNT to 0x0501 or higher and setting the LVS_EX_DOUBLEBUFFER extended style of the list control.
It’s no secret that the color of the outline of the selection rectangle is set to COLOR_HIGHLIGHT which is the color set for selected items. But, what about the rest of the rectangle? Where does the color for the inside of the rectangle come from?
Obviously it’s calculated dynamically from the selected color and the color of the window background (COLOR_WINDOW) since it’s “translucent”. A little testing confirms this. But, what is the equation? What formula is used to blend these two colors?
A few years ago I determined to find out. I began by collecting data. This meant using the Display Properties dialog to set the selected and the window background colors, then drawing a selection rectangle and examining what the resulting color is. After doing this for dozens of pairs of colors, I had a data set and decided to figure out what they have in common. This turned out to be trickier than expected and I put it aside and occasionally looked at it briefly over the next two or three years.
This month when I learned of the LVS_EX_DOUBLEBUFFER style, I became more determined than ever to figure it out. Luckily I could not find the original data set (which would have surely side-tracked me for a while), so I decided to compile a new one with a controlled set of values instead of the random ones I had previously used. I used the following values: 0,64,128,192,255 in (almost) all the permutations of R/G/B and selected/background. I created a macro to automate the process of:
- Selecting the selected and window background colors
- Applying the theme
- Switching to an Explorer window and drawing a rectangle
- Taking a screenshot of the window and rectangle
- Pasting the screenshot in MSPaint
- Using a colorpicker app to determine the three colors and copy them to the clipboard
- Pasting the colors in Notepad(2) in the proper format
- Saving the file (to avoid losing all that work)
This automation allowed me to complete all 289 (17×17) permutations in just a couple of hours instead of a couple of months, since the only thing I needed to do manually was to click the correct boxes in the color picker.
Now I had a fresh, new set of data points that ranged from the min to the max in all directions. It was time to figure out the equation once and for all.
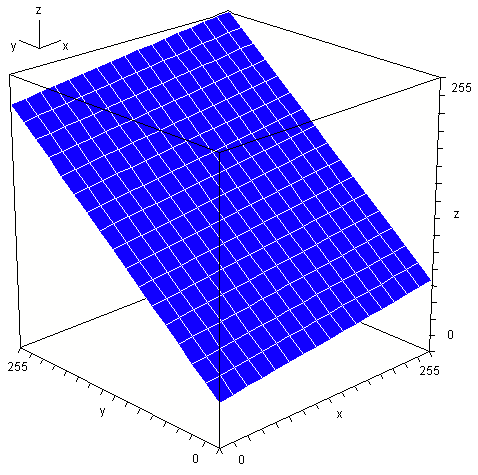
A good place to start was to plot the data points as a 3D graph where X=selected color, Y=background color, Z=blended color to see if there is any kind of visible relationship. A few minutes later and BAM! The plot was clearly a slanted plane:
Now I needed to figure out what the equation of the plane was. This was also easier said than done.
I decided that the most obvious next step was to use Cramer’s rule to determine the planar coefficients A, B, C, and D, then plug them into the equation of a plane and rearrange for Z. This meant taking three points (I had 289 to choose from) and calculating the planar coefficients. Plugging those into the plane equation would result in this z=-(Ax+By+D)/C where ABCD are replaced by numbers. This leaves an equation with two unknowns (two input variables). That would be the solution.
Unfortunately, this did not work. I was using COLORREFs (DWORDs) which combine all three color components in the following manner: C=R+256*G+256*256*B. The problem with doing it this way is that any math will cause carry errors between the components (eg: C*2 would cause the R component to wrap and the carry would overflow into the G component). The solution was to determine three separate equations, one for each of R, G, and B.
Luckily this did not mean triple the work because they were all the same equation as the data shows. Ignoring the G and B components, I took the 289 data points for the R component and recalculated everything. Again, it didn’t work. Even though the points clearly lay on a plane, the numbers (even the surface normals!) varied depending on which three points I used. I was stumped again (and still am; I don’t know why it works in theory but not in practice).
Then I got a stroke of “genius”. By examining the limiting factors, I could reduce the system to its base. Since f(0,0)=41, the mystery formula obviously adds 41 to whatever the rest of the results are. Also, since f(255,255)=255, I know what the limits are. Finally, I knew the other extents: f(0,255)=227 and f(255,0)=69. That turned out to be all I needed (I donated the other 285 data points to charity). I had the following system of equations:
f(000,000)=41
f(000,255)=227
f(255,000)=69
f(255,255)=255
Using Cramer’s rule again, this time with much smaller numbers for a single color component, and then reducing, I got the the nice and simple formula z = 41 + (28*x + 186*y) / 255. A quick test showed that the results were correct (actually a few were a bit off, but almost all of those were fixed by rounding instead of truncating, and the last few off-by-ones are due to using different data sizes and order of calculation).
So there you have it. After two-and-a-half years, the solution presented itself: c=(28s+186w)/255+41 (s=selected, w=window background—or texture).
Here is a function for calculating the marquee color (selection rectangle), printed here with separate component variables for clarity’s sake.
COLORREF BlendMarquee() {
 COLORREF selected=GetSysColor(COLOR_HIGHLIGHT);
 COLORREF windowbg=GetSysColor(COLOR_WINDOW);

 BYTE sr=GetRValue(selected);
 BYTE sg=GetGValue(selected);
 BYTE sb=GetBValue(selected);

 BYTE wr=GetRValue(windowbg);
 BYTE wg=GetGValue(windowbg);
 BYTE wb=GetBValue(windowbg);

 COLORREF c=RGB(
  RoundDouble(41+(sr*28+wr*186)/255, 0),
  RoundDouble(41+(sg*28+wg*186)/255, 0),
  RoundDouble(41+(sb*28+wg*186)/255, 0)
 );

 return c;
}
Tada!
Part II
Brief: Windows Vista (and 7) have changed things a little. For starters, they have made it so that the transparent marquee occurs on the desktop (COLOR_BACKGROUND) naturally when the option is selected without requiring the LVS_EX_DOUBLEBUFFER style to be manually set (the desktop is just a list-view control). In addition, while they still use the selected-item color (COLOR_HIGHLIGHT) for the border of the selection rectangle, they no longer use it in the calculation of the rectangle’s interior color. Instead, they combine the background color with the hyperlink/hot-tracked color (COLOR_HOTLIGHT). In addition, unlike in XP which uses a single formula, Vista and 7 use different formulas for calculating the color of the marquee depending on whether it is being drawn in an Explorer window or on the desktop.
When I decided to check to see if my marquee formula was still valid for Windows 7, a quick test showed that the selected-item color was not being used. For a moment I worried that Microsoft had simply hard-coded a color into the formula, combining a blueish color with the background, but figuring that they couldn’t be that insane, I searched through the Window Color and Appearance dialog for something that was blue. There were a couple, but I was not very surprised to find that the hyperlink entry was the one that changed the marquee color. Another quick test found that the resulting color was not the same as what the old formula would give. I had to extract the new formula.
I had hoped that I could use everything I learned the last time around to make it quick and easy this time. While it did take only a few hours instead of a few years, it was not as quick and easy as I was counting on. I looked through the files (particularly the last few modified) in the folder where I kept everything related to the prior investigation, and especially re-read this article. Unfortunately they were insufficient, particularly since I had not clearly written out one of the steps above (it’s there now), leaving me confused and struggling a bit and wasting some time by once again gathering unnecessary data points (not including the fact that I had to repeat everything twice; once for window backgrounds and once for the desktop because it uses a different formula).
Eventually I just focused on the limits like I did last time. I became a little worried that I was making a mistake because unlike in XP, the new marquee formula allows for pure black in addition to pure white rectangles (in XP, the formula limits the color to the range 41-255; remember the +41?) Worse, using middle-grey (128) for the window and hyperlink colors, gives 128, which seemed too unformulaic. I tried the numbers I had anyway.
I chose three points (0/255, 255/0, and one of the other two, either 255/255 or 0/0). I then plugged them into the formulas, factored, had a snack, watched a movie, reduced, and tested, and was done; well, for the desktop. I still had to repeat for window backgrounds. Fortunately this time I was able to cut eight or nine corners and skip right to the end, plugging in the numbers for the window backgrounds and finally had two formulas for calculating the marquee color in Windows 7 (I’m crossing my fingers that it is the same in Vista).
The function is slightly more complex now.
enum Marquee_Source={Marquee_Window, Marquee_Desktop};

COLORREF Marquee(COLORREF fc, COLORREF bc, BYTE fv, BYTE bv, BYTE hiv, BYTE lov) {
  BYTE fr=GetRValue(fc);
  BYTE fg=GetGValue(fc);
  BYTE fb=GetBValue(fc);

  BYTE br=GetRValue(bc);
  BYTE bg=GetGValue(bc);
  BYTE bb=GetBValue(bc);

  COLORREF c=RGB(
    RoundDouble(lov + (fr*fv + br*bv) / hiv, 0);
    RoundDouble(lov + (fg*fv + bg*bv) / hiv, 0);
    RoundDouble(lov + (fb*fv + bb*bv) / hiv, 0);
  );

  return c;
}

COLORREF BlendMarquee(Marquee_Source source=Marquee_Window) {
  DWORD dwWinVer =GetVersion();
  DWORD dwMajVer =(DWORD)(LOBYTE(LOWORD(dwWinVer));
  DWORD dwMinVer =(DWORD)(HIBYTE(LOWORD(dwWinVer));
  DWORD dwBldVer =(dwWinVer<0x80000000)?(DWORD)(HIWORD(dwWinVer):0;

  if (dwMajVer==5 && dwMinVer>0) {  //XP
    return Marquee(GetSysColor(COLOR_HIGHLIGHT),  GetSysColor(COLOR_WINDOW), 0x1C, 0xBA, 0xFF, 0x29);
  }
  else if (dwMajVer==6) {  //Vista, 7
    if (source==Marquee_Desktop)
      return Marquee(GetSysColor(COLOR_HOTLIGHT), GetSysColor(COLOR_WINDOW), 0x46, 0xB9, 0xFF, 0x00);
    else
      return Marquee(GetSysColor(COLOR_HOTLIGHT), GetSysColor(COLOR_WINDOW), 0x85, 0xAA, 0xFF, 0x00);
  }

  return RGB(128,128,128);
}
What’s interesting is the use of magic numbers (in this case, seemingly arbitrary in that they are not nice “round numbers” like 0, 10, 16, 64, 100, etc.) One can only assume that some GUI designers in Microsoft came up with formulas (and the corresponding values) that made the nicest, most visually appealing, yet contrasting blend for the transparent rectangle.