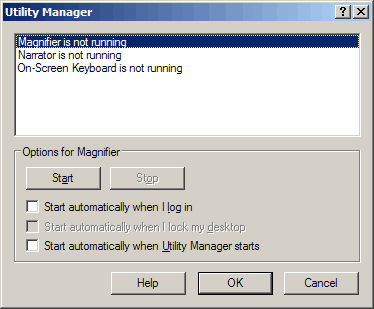
Windows includes several built-in screensavers, including one that shows 3D text. In the settings dialog for the 3D text screensaver, you can select to have it render with a reflection or texture, thus giving it a metallic look. When you select either the reflection or texture settings, you can then specify a bitmap file to have Windows use that when rendering the 3D text. If you do not specify a bitmap, it still renders it with a texture using a built-in graphics file. Interestingly enough, even though the custom-text-dialog box defaults to only bitmap (.BMP) files, the built-in textures are actually JPEGs.
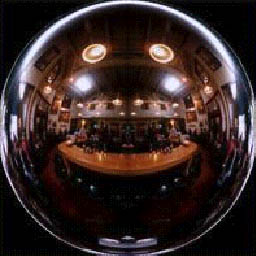
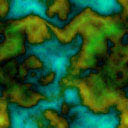
If you have ever wondered what they look like, you can see them by opening the screensaver file (ssText3d.scr) in a resource editor and looking in the JPG section. The two files look like this (they are identical in Windows XP and Windows 7):
The reflection texture has been used in some of the DirectX samples in the DirectX SDK and if I remember correctly, is a photo of the lobby at Microsoft.The generic texture looks an awful lot like those from some texture packs like Absolute Cross or Propaganda Tiles.
Open a command prompt and type the following command: cls>clstest.txt. Now examine the contents of clstest.txt. You will see that it contains one character: 0x0C—FF which stands for form-feed. That’s right, CLS clears the screen by merely scrolling the previous contents out of sight by printing out a form-feed character; well, almost merely.
If you are using XP or higher, set the command prompt window to have a larger buffer and try this command: more /p clstest.txt. It displays the contents of the file, expanding any form-feed characters it finds. What happens is that the display scrolls the previous contents up by the number of lines equal to the console window’s screen height, which can be less than the buffer height, effectively clearing the screen, but leaving buffer.height-screen.height lines unaffected; you can still scroll up to see the previous contents. Using the CLS command however does erase the contents of the buffer and resets the cursor to the top-left most position.
CLS prints a form-feed character because when it was first created back in the days of early versions of (MS-)DOS there were no back-buffers and screens were a fixed size.
This behavior of CLS is still present even in Windows 7. It is interesting to see some of the indelible backwards compatibilities.
You can type control codes at command prompt in Windows (and DOS) by pressing the corresponding key with the Control key. Get it, Control key for control code?
The connection between letter and code is simple: add 0x40. That is, for control code 1, add 0x40 to get 0x41 which is the ASCII code for ‘A’, therefore press Ctrl+A to get character 1 (SOH).
But, the alphabet only accounts for 26 of the first 32 characters. What about codes 27-31? The correspondence remains the same. Character 27 (ESC) is 0x1B+0x40=0x5B which is ‘[’, 28 (FS) is ‘\’, 29 (GS) is ‘]’, 30 (RS) is ‘^’, and 31 (US) is ‘_’.
Unfortunately, since ‘_’ is a shifted character, it requires holding Shift to create, so it is not possible to press Ctrl+Shift+- to get character 31 that way (and for the curious, no, Ctrl+- won’t work). For that, you’ll have to resort to the classic Alt+Numpad method (Alt+31 on the numeric pad).
Conversely, you cannot press Alt+0 to type character 0 (NUL). To get null, you have to use the Control key. Remember that it requires adding 0x40, so zero plus 40 is, well, 40. That’s right, 0x40 (64) is ‘@’ so, pressing Ctrl+Shift+2 (or just Ctrl+2) gets some sort of reaction. However, it does not seem to produce the expected effect, probably because nulls are string terminators for any software that uses ASCIIZ encoding (a very common method). (So Ctrl+2 is Null; that explains why it can sometimes be used as an abort chord similar to Ctrl+C or Break).
In practice (in at least XP’s command line), Ctrl+@ causes the prompt “More? ”, after which it passes whatever the user enters to the program as a parameter. For example the command echo ^@ followed by the the user entering testing would print out testing because the string was piped into the echo command. Another example: dir ^@ allows the user to select the file/directory to list (entering /s at the prompt would display all subdirectories). There does not seem to be a way to prevent the prompt from being displayed (not even by redirecting to nul).
No doubt, some creative and enterprising individual will be able to exploit this feature to enhance batch files.
If you are downloading files from a P2P network, then be especially wary of viruses.
One dead giveaway is when a search gives you moderate results, but then you get a few results (usually at the end of the search) that suddenly have hundreds, or even thousands of sources, particularly if those files are of wildly different sizes. What happened, did you get really lucky and manage to find a hidden cache of the file you were looking for? No, those few results that show hundreds or thousands of sources for the file you were searching for are not real, they are viruses that a bad server returns. When you do a search, the servers that are queried return a list of sources for that file that they know of. There are fake servers and virus pits that always respond with a very large number of sources no matter what the file is. They return a large number as bait, and if someone attempts to download the file, they receive one of a number of fakes (possibly even dynamically created), which are infected with viruses and other malware, regardless of what file they were trying to get.
Yet another dead giveaway is when you get a ZIP file that contains three files, an EXE, a DLL, and a TXT, especially if the files have gibberish filenames. This is a common dummy file that virus pits send out which contains an encrypted virus (checking the binary contents looks like it’s not an executable, but it is merely XOR-encrypted and is indeed a virus). What’s interesting about this one is that it usually uses the tag ZWT. ZWT is an actual scene group that does release “legitimate” cracks and such. It is unknown whether the owners of the virus pits that send out fake ZWT-tagged files targeted ZWT on purpose or not, but since it is the only group who’s name is used in the fakes, it may very well be the case.
One more virus-infected fake pattern that is making the rounds on the donkey network is the one where the resulting files contain an NFO file and an EXE. The EXE is the virus, and the NFO contains nothing but a numerical url: eg www.209193.com, www.39520.com, etc. These ones often contain the name of a piece of software or something in the names, and even version numbers to look even more legitimate. However, they don’t usually contain release group names.
As usual, be very wary of anything you download, especially from P2P networks, and in particular when looking for warez. Always check files that you download with at the very least a virus scanner, if not a trojan scanner, worm scanner, rootkit scanner… You can also run them through online scanners such as Jotti’s, Virus.org, and Virustotal.
If everyone kept themselves clean, the whole world would be cleaner overall. If you must pirate, practice safe piracy.
If you have ever used the DIR command to list numbered files in a command prompt and been confused by the output, it may have been due to SFNs.
Here is an example to demonstrate the problem. In a directory with files with long names and numbered filenames, you might type dir *1.txt to list all files that end in a 1. However you may end up getting a bunch of files that do not end in a 1 mixed in with the results.
What happened? Remember that each file that has a long filename has a DOS compatible (8.3) SFN associated with it. These are usually six characters from the filename followed by a swung-dash and a numerical counter. In other words, “Long Filename.txt” would not only have that as it’s name, but also “LONGFI~1.TXT”. And there’s the 1!
If there are multiple LFN files (that are too long or have spaces) that begin with LONGFI—eg “Long File.txt”, “Long Fi.txt”, etc.—then they will be saved as LONGFI~2.txt, LONGFI~3.txt, and so on. Therefore you may get weird results for dir *2.txt, dir *8.txt, dir *516.txt…
There does not seem to be a way around this, but using the /X switch can at least reveal the source of the unexpected results.
If Windows Explorer seems to freeze for a few seconds (or a few minutes) whenever a folder, especially top-level folders, are selected, then it could be XP’s auto-sensing feature that is to blame.
Windows XP introduced a feature that peeks inside a folder to determine what the predominate filetype is and provide file-specific tasks for it. For example, if it finds that there more picture files in the folder than anything else, then it will place tasks such as “Print pictures” and “Order prints online” in the Common Tasks pane to the left. It will also place a graphic watermark indicating the “folder type” in the bottom-right of the folder.
This feature is debatable because it has limited use since most people have other ways and programs to do these common tasks. Worse still, if a root folder somehow becomes tagged as a special folder, then all of its subfolders are scanned every time that it is selected, which is what causes the freezing.
Fortunately it is easy to fix. Open a folder that is not “special”, that is, open any folder whose common tasks pane displays “File and Folder Tasks” and has no watermark. Now click the Tools menu and select Folder Options. Click the View tab and then the Apply to All Folders button (then OK). This sets all folders to be the same as the current folder (non-special).
You should now be able to click any folder without it freezing for a while.
As a furtherance to this task, you could also set up other aspects of the folder to be exactly like you wish before clicking Apply to All Folders. This way, all folders will have the same columns, view setting, common task layout, and other attributes that you desire since they will anyway.
(As a side note, it seems that the delay is compounded by the presence of LNK files (Windows shortcuts) and URL files (IE bookmarks)—and possibly PIF files (DOS shortcuts)—in the subfolders as removing them eliminates, for the most part, the freezing. Broken shortcuts increase the delay as do bookmarks to FTP sites. No explanation as to why they affect common tasks has been found.)
It took over two years but I finally figured out how Microsoft calculates the color of the selection marquee in Windows.
Windows XP implemented a fancy new feature whereby dragging a selection box (aka, “rubber-band”) around files and folders in Explorer windows will draw a transparent rectangle instead of a gray-dotted box.
This is a feature of the Common Controls 6 and can be added to list controls by setting the preprocessor _WIN32_WINNT to 0x0501 or higher and setting the LVS_EX_DOUBLEBUFFER extended style of the list control.
It’s no secret that the color of the outline of the selection rectangle is set to COLOR_HIGHLIGHT which is the color set for selected items. But, what about the rest of the rectangle? Where does the color for the inside of the rectangle come from?
Obviously it’s calculated dynamically from the selected color and the color of the window background (COLOR_WINDOW) since it’s “translucent”. A little testing confirms this. But, what is the equation? What formula is used to blend these two colors?
A few years ago I determined to find out. I began by collecting data. This meant using the Display Properties dialog to set the selected and the window background colors, then drawing a selection rectangle and examining what the resulting color is. After doing this for dozens of pairs of colors, I had a data set and decided to figure out what they have in common. This turned out to be trickier than expected and I put it aside and occasionally looked at it briefly over the next two or three years.
This month when I learned of the LVS_EX_DOUBLEBUFFER style, I became more determined than ever to figure it out. Luckily I could not find the original data set (which would have surely side-tracked me for a while), so I decided to compile a new one with a controlled set of values instead of the random ones I had previously used. I used the following values: 0,64,128,192,255 in (almost) all the permutations of R/G/B and selected/background. I created a macro to automate the process of:
Selecting the selected and window background colors
Applying the theme
Switching to an Explorer window and drawing a rectangle
Taking a screenshot of the window and rectangle
Pasting the screenshot in MSPaint
Using a colorpicker app to determine the three colors and copy them to the clipboard
Pasting the colors in Notepad(2) in the proper format
Saving the file (to avoid losing all that work)
This automation allowed me to complete all 289 (17×17) permutations in just a couple of hours instead of a couple of months, since the only thing I needed to do manually was to click the correct boxes in the color picker.
Now I had a fresh, new set of data points that ranged from the min to the max in all directions. It was time to figure out the equation once and for all.
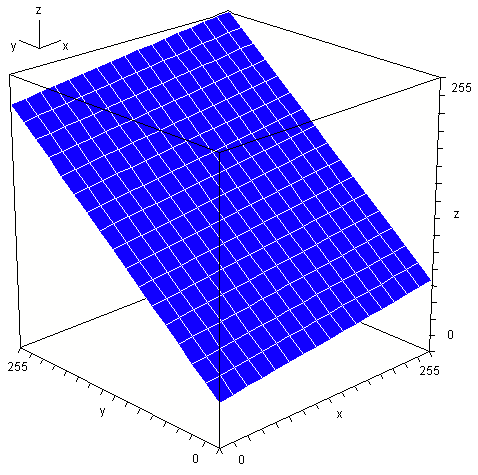
A good place to start was to plot the data points as a 3D graph where X=selected color, Y=background color, Z=blended color to see if there is any kind of visible relationship. A few minutes later and BAM! The plot was clearly a slanted plane:
Plot forms a slanted plane in 3D space.
Now I needed to figure out what the equation of the plane was. This was also easier said than done.
I decided that the most obvious next step was to use Cramer’s rule to determine the planar coefficients A, B, C, and D, then plug them into the equation of a plane and rearrange for Z. This meant taking three points (I had 289 to choose from) and calculating the planar coefficients. Plugging those into the plane equation would result in this z=-(Ax+By+D)/C where ABCD are replaced by numbers. This leaves an equation with two unknowns (two input variables). That would be the solution.
Unfortunately, this did not work. I was using COLORREFs (DWORDs) which combine all three color components in the following manner: C=R+256*G+256*256*B. The problem with doing it this way is that any math will cause carry errors between the components (eg: C*2 would cause the R component to wrap and the carry would overflow into the G component). The solution was to determine three separate equations, one for each of R, G, and B.
Luckily this did not mean triple the work because they were all the same equation as the data shows. Ignoring the G and B components, I took the 289 data points for the R component and recalculated everything. Again, it didn’t work. Even though the points clearly lay on a plane, the numbers (even the surface normals!) varied depending on which three points I used. I was stumped again (and still am; I don’t know why it works in theory but not in practice).
Then I got a stroke of “genius”. By examining the limiting factors, I could reduce the system to its base. Since f(0,0)=41, the mystery formula obviously adds 41 to whatever the rest of the results are. Also, since f(255,255)=255, I know what the limits are. Finally, I knew the other extents: f(0,255)=227 and f(255,0)=69. That turned out to be all I needed (I donated the other 285 data points to charity). I had the following system of equations:
Using Cramer’s rule again, this time with much smaller numbers for a single color component, and then reducing, I got the the nice and simple formula z = 41 + (28*x + 186*y) / 255. A quick test showed that the results were correct (actually a few were a bit off, but almost all of those were fixed by rounding instead of truncating, and the last few off-by-ones are due to using different data sizes and order of calculation).
So there you have it. After two-and-a-half years, the solution presented itself: c=(28s+186w)/255+41 (s=selected, w=window background—or texture).
Here is a function for calculating the marquee color (selection rectangle), printed here with separate component variables for clarity’s sake.
Brief: Windows Vista (and 7) have changed things a little. For starters, they have made it so that the transparent marquee occurs on the desktop (COLOR_BACKGROUND) naturally when the option is selected without requiring the LVS_EX_DOUBLEBUFFER style to be manually set (the desktop is just a list-view control). In addition, while they still use the selected-item color (COLOR_HIGHLIGHT) for the border of the selection rectangle, they no longer use it in the calculation of the rectangle’s interior color. Instead, they combine the background color with the hyperlink/hot-tracked color (COLOR_HOTLIGHT). In addition, unlike in XP which uses a single formula, Vista and 7 use different formulas for calculating the color of the marquee depending on whether it is being drawn in an Explorer window or on the desktop.
When I decided to check to see if my marquee formula was still valid for Windows 7, a quick test showed that the selected-item color was not being used. For a moment I worried that Microsoft had simply hard-coded a color into the formula, combining a blueish color with the background, but figuring that they couldn’t be that insane, I searched through the Window Color and Appearance dialog for something that was blue. There were a couple, but I was not very surprised to find that the hyperlink entry was the one that changed the marquee color. Another quick test found that the resulting color was not the same as what the old formula would give. I had to extract the new formula.
I had hoped that I could use everything I learned the last time around to make it quick and easy this time. While it did take only a few hours instead of a few years, it was not as quick and easy as I was counting on. I looked through the files (particularly the last few modified) in the folder where I kept everything related to the prior investigation, and especially re-read this article. Unfortunately they were insufficient, particularly since I had not clearly written out one of the steps above (it’s there now), leaving me confused and struggling a bit and wasting some time by once again gathering unnecessary data points (not including the fact that I had to repeat everything twice; once for window backgrounds and once for the desktop because it uses a different formula).
Eventually I just focused on the limits like I did last time. I became a little worried that I was making a mistake because unlike in XP, the new marquee formula allows for pure black in addition to pure white rectangles (in XP, the formula limits the color to the range 41-255; remember the +41?) Worse, using middle-grey (128) for the window and hyperlink colors, gives 128, which seemed too unformulaic. I tried the numbers I had anyway.
I chose three points (0/255, 255/0, and one of the other two, either 255/255 or 0/0). I then plugged them into the formulas, factored, had a snack, watched a movie, reduced, and tested, and was done; well, for the desktop. I still had to repeat for window backgrounds. Fortunately this time I was able to cut eight or nine corners and skip right to the end, plugging in the numbers for the window backgrounds and finally had two formulas for calculating the marquee color in Windows 7 (I’m crossing my fingers that it is the same in Vista).
What’s interesting is the use of magic numbers (in this case, seemingly arbitrary in that they are not nice “round numbers” like 0, 10, 16, 64, 100, etc.) One can only assume that some GUI designers in Microsoft came up with formulas (and the corresponding values) that made the nicest, most visually appealing, yet contrasting blend for the transparent rectangle.
Windows Explorer allows you to sort the files and directories in a folder by various properties by clicking the appropriate column header. Folders always come before files regardless of name, and there is unfortunately no way to change this even though sometimes it is desirable to sort with mixed folders/files.
The algorithm for sorting by name is mostly straightforward but with some bumps. Knowing the sort order allows you to choose characters to use as the first character in a file or folder name to control sorting, for example when creating a filing system.
For the most part, the algorithm sorts files/folders by name according to their ASCII values, expect that case is ignored because on Windows, filenames are case-insensitive, that is “MYFILE”, “MyFile”, and “myfile” are all the same file—iirc NTFS can do case-sensitive but it’s actually a hack (mapping).
You should also be aware that numbers are treated as numbers and not strings. For example “123blah” will come after “2blah” since 123 is bigger than 2, even though “1”-“2”-“3” comes before “2”. This behavior can be changed with the NoStrCmpLogical option of the Explorer policies (set HKEY_CURRENT_USER\Software\Microsoft\Windows\CurrentVersion\Policies\Explorer\NoStrCmpLogical to dword:00000001).
Another bump in the algorithm is that the following characters appear out of order: +, <, and > They come after all other characters, in this order. Also, ‘ and – are ignored altogether when they are the first character.
Here is a list of characters in the order that they will be sorted when used as the first character:
1 – Not (normally) allowed as a filename character
2 – Not in ASCII order
3 – Not used in sort when first character
(space)
!
” 1
#
$
%
&
(
)
* 1
,
.
/ 1
: 1
;
? 1
@
[
\ 1
]
^
_
`
{
| 1
}
~
+ 2
< 1,2
= 1
> 1,2
–
‘ 3
– 3
This knowledge will be used in a later article to create a filing system that will allow organization of files and folders since Windows doesn’t really have symbolic links and WinFS has been cancelled until at least Windows Vienna.
It has become more and more popular to blame computer problems on bad RAM—poor RAM. While it’s certainly possible to have a RAM module with a problem, it’s not as common as people would have you believe. In the past few years with the release of various RAM testing apps, there has been a surge of comments to the effect of “test your memory”, “you’ve probably got bad RAM”, “you need to replace your RAM” in response to posts about computer problems. It is just so easy to blame the RAM since it’s one of the only things that can successfully explain intermittent or unexplainable problems. The snafu is that even when the RAM is at fault, it’s not necessarily because the RAM is bad, it could—and usually is—because the connection is bad.
There are three common ways that RAM can be the cause of a problem. The way that everyone is raving about is a defective RAM module, that is a problem in a RAM chip or circuitry. This would render it useless (for all intents and purposes) and require just chucking it and getting a new one. Another problem could be the contacts on the edge of the RAM module could be dirty or have a patina on them, which impedes contact with the socket. In this case, the RAM may or may not be detected and could work partially or not at all. Finally, the RAM socket itself could have a problem. It could be that the contacts are dirty or the pins/pads are bent. Fortunately the contact problems are more common and easily fixed.
If the contacts on the RAM module are dirty, then simply using a little water to dampen a small sponge can be used to clean them. There are fancy patina cleaners, but all you really need to do is to clean those little pins on the edge. Pretty much anything will do, even alcohol or solvents, as long as you don’t let them dissolve the metal, just clean them and wipe it off. The best solution of course is to use some good old soapy water and some toilet paper.
The RAM socket is a little more tricky. If the pins are dirty, an effective solution is to lightly wet a used toothbrush, and gently scrub the socket up and down with it. This will do a good job of cleaning it.
If the pins on the socket are bent, then it may not make proper contact with the RAM module and will be a problem. More often than not, you will have to abandon the socket or even the whole motherboard, but with a little dexterity and the right tools you can fix it. You will need a long, find-tipped object, like a dentist pick, or something. It must be long enough so that your hands don’t obstruct your view, and pointy enough so that you can work with the tiny pins. You will probably need two so that you can grasp them and bend them back. You will also need good lighting and perhaps a magnifying glass. Take a good look at the socket and locate the bent pin. Examine it carefully to determine exactly what the problem is and which way you need to bend it to fix it. Use the tools to carefully bend it back to match the others. Plug in the RAM and give it a test. Be aware however, that they are metal and can only be bent so many times before snapping.
In conclusion, don’t throw away your RAM just because someone told you that it’s the cause of a problem or because a testing app said there’s problem(s). Before heading to the store, clean the RAM edge and run it through the test app. If that doesn’t fix it, clean the socket. If that doesn’t fix it, check for bent pins. If that doesn’t fix it, then go to the store.
.png)
.png)